- Stable Diffusion WebUI Basic 01–Introduction
- Stable Diffusion WebUI Basic 02–Model Training Related Principles
- Stable Diffusion WebUI Basic 03– FineTuning Large Models
Foreword of Stable Diffusion WebUI Basic
This article aims to explain the principles of Stable Diffusion WebUI in a more accessible manner. By the end, you will understand the following topics:
- What is Stable diffusion?
- How is diffusion stabilized (with text-to-image as an example)?
- CLIP: How do text prompts influence outcomes?
- UNet: How does the diffusion model work?
- Understanding the encoding and decoding process of VAE.
What is Stable Diffusion WebUI?
Stable Diffusion is like a digital artist that creates images through controlled noise manipulation. The name comes from its two core aspects: “stable” refers to the predictable way it processes images, while “diffusion” describes how it transforms random noise into coherent pictures.
Here’s how the magic happens:
- Noise Play: The algorithm either adds noise (forward diffusion) or removes it (reverse diffusion) using specific mathematical rules.
- Guided Transformation: Starting with random static (like TV snow), it gradually sculpts this chaos into your desired image. Want “a red flower”? It’ll methodically shape the noise petal by petal until your bloom appears.
- Web Interface: The WebUI makes this complex tech accessible to everyone – no coding required. It’s like having a professional digital art studio in your browser.
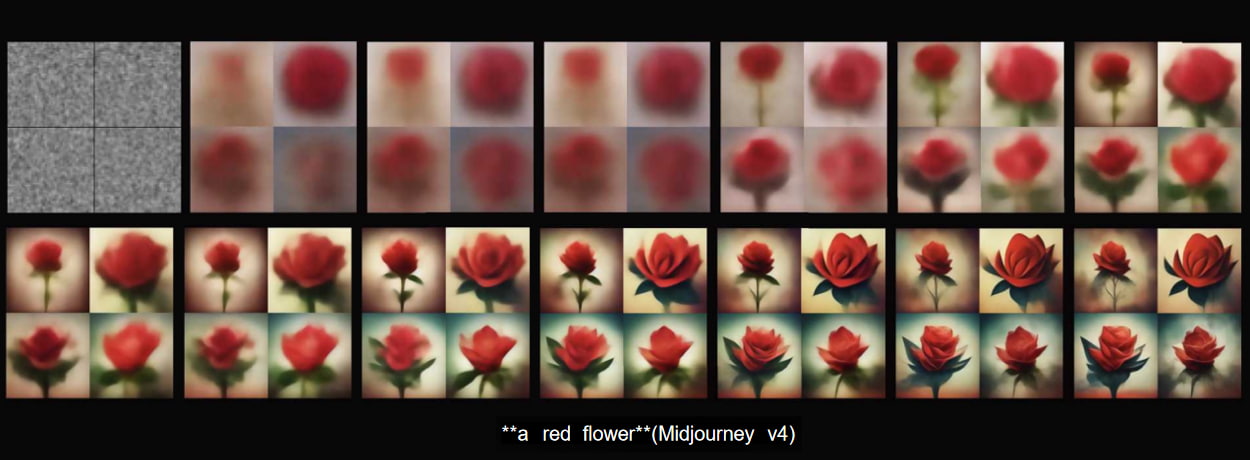
The Science Behind the Stability of Stable Diffusion WebUI
Think of Stable Diffusion as Fsd(prompt) – a smart function that turns words into images. When you type “majestic mountain sunset,” it:
- Systematically adds/removes noise
- Maintains control through each refinement step
- Ensures the final image matches your description

CLIP: The Language Interpreter
CLIP acts as the translator between human language and machine understanding. When you type “cute girl”:
- Breaks down the phrase into concepts (big eyes, soft features)
- Creates 768-dimensional “idea vectors”
- These vectors guide the image creation process

Common question: “Why do similar prompts give different results?”
The secret sauce is in the denoising process. Different models use unique “cleaning” techniques, meaning the same prompt can lead to varied artistic interpretations.
UNet: The Image Sculptor
This neural network:
- Transforms static into detailed images
- Works with CLIP’s translated vectors
- Uses Q (what to focus on), K (how to compare), and V (actual values) parameters
- Progressively cleans up noise over 20+ steps

Key insight: Simple step-by-step denoising doesn’t work well. UNet uses smart pattern recognition to make meaningful jumps in image quality.
Classifier-Free Guidance: The Prompt Enforcer
This clever trick ensures your text prompt actually matters:
- Creates two versions simultaneously – one following prompts, one “wild”
- Amplifies the differences between them
- Uses this contrast to strengthen prompt adherence
In the WebUI, you control this through “Prompt Strength” – your personal “listen to me” slider for the AI.

Image-to-Image Transformation
Want to modify existing photos? The process:
- Adds noise to your original image
- Blends it with your text prompt during denoising
- Creates hybrid results mixing old and new elements
VAE: The Space Compressor
This compression wizard:
- Shrinks 512×512 images to 64×64 “essence maps”
- Lets UNet work efficiently in this compact space
- Finally expands everything back to full resolution
Fun fact: Working in compressed space is why sometimes fingers might look slightly odd – the AI is reconstructing details from a miniaturized blueprint!

Now that we’ve covered how Stable Diffusion works, you might be wondering: “How do we actually train these models?” Let’s dive into the training process next!
More
If you want to dive into the breathtaking world of AI image generation? You’ve landed in the perfect spot! Whether you’re looking to create stunning visuals with Midjourney, explore the versatile power of ComfyUI, or unlock the magic of WebUI, we’ve got you covered with comprehensive tutorials that will unlock your creative potential.
Feeling inspired yet? Ready to push the boundaries of your imagination? It’s time to embrace the future, experiment, and let your creativity soar. The world of AI awaits—let’s explore it together!
Share this content:


1 comment